The Photography Breakdown: A Photo Shoot’s Best Friend
Posted in Insights

Images make the World Wide Web go around. They’re the visual shorthand that helps users understand your brand emotionally and find information they need logically. The challenge is making sure the many images you have in mind to populate a website meld with what the photographer shoots.
Guiding imagery overall can be advanced Art Director stuff. But leaving aside other issues (selecting photographers, talent, defining brand image style, and usage rights), here’s how to break down images in a brief that guides a shoot, whether you’re on site or not. Put simply, it’s how to use your words to get your pictures.
1. BUDGET OVERVIEW Include a basic budget overview right up front. It doesn't have to be intricate, just a short and sweet reminder of the amount of money that has been allocated in return for the final expected deliverables.
2. PHOTOSHOOT OVERVIEW Here’s where you set the overall expectations and clarify what you need. Start with a simple synopsis of the high-level brand impression and style you’re trying to achieve, and then list the number and type of compositions ad environments you’ll need to execute the project at hand.
3. DETAILED IMAGERY BREAKDOWN With the big picture in mind, break down each individual composition and detail what will be included and/or avoided in the shots. Briefly describe each composition, type of environment it will be in, and for what product or purpose. For instance, "Composition #1 will focus on shooting a cup of coffee, at a cafe, in the middle of the day." Simple? Yes, but start there. It should include the type of environment, type of lighting you want, the angle the photo should be taken from, and so forth. Continuing with the cafe example, think through everything that needs to be in that shot:
- Do you want people in the shot? What age, dress, gender?
- Will they be sipping coffee? How about their mood?
- What kind of cup do you want the coffee to be held in?
- Is the photo taken outside of the cafe or inside?
- What props or furnishings are important to establish the environment and situation?
These questions scratch the surface of a multitude of elements that make up a composition. Take time to think through the possibilities. Here’s where anything left to chance may get left out. So — spell it all out.
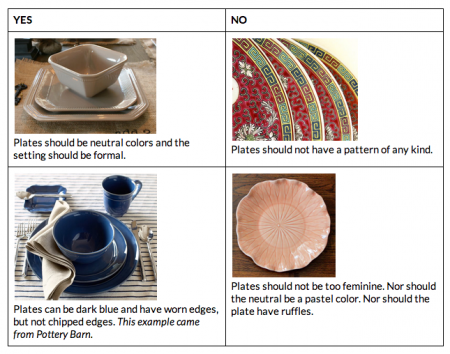
 Example of table element direction from a Photography Brief[/caption]
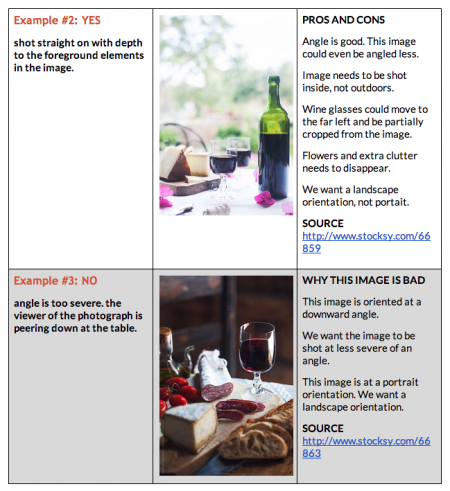
 Example of angle direction[/caption]
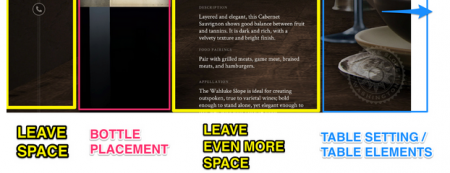
While dissecting each composition, remind yourself of the context. Both your general brand intention and the specific application to a site design come into play. Note how the elements on the page will interact with your custom photos. Where are you going to place the majority of the text? Will it interfere with the photo? Will this result in losing legibility in your text? If so, then take a screen shot of your website and block out the areas that need to be left blank in the photo, so that the text or other website elements can reside there and be seen.
Leaving an area blank means making sure there is not excessive visual noise within a photograph. For instance, if there are large windows inside the cafe in Composition #1 and it is in the middle of the day, then the glass on the windows will probably appear washed out with white and blobs of dark and light hues intermixed. If you planned on placing all white copy over this section, the text may lose legibility in those lighter areas in the background. Show your designs and copy placement to the photographer, so they can see what you are talking about when you say you need a blank area in the photograph and then they can compensate for these things.
 Example of open or blank space direction[/caption]
IMAGE DETAILS CHECKLIST
*Subject *- Where will your product or scene live?
Lighting - Did you design your website to be dark or light? Do you want ambient light, rim light, or will your shot only be lit from one side?
Correlation** - **How will the website and photography correlate? Remember - keep text placement in mind.
*Environment / place *- Where are you going to shoot ? Inside? Outside? Under water?
Environmental elements - What are you going to include in the shot? People? Food? Props?
Angle -What angle will these shots take? 45° above? Slightly below? Straight down? Angles are tricky, so provide an example image at the angle you have in mind.
Orientation - Should it be in a portrait or landscape orientation? Maybe a panoramic view?
Props - Specify the style and material of all props. Direct how you want the props styled and the different arrangements you want captured.
Distance - Do you need the subject to be photographed from a distance or up close? It’s a big mood shift.
Focus - Do you want your entire photograph in focus? Or do you only want part of it? Do you want a strong, bokeh blur? Or do you want something less out-of-focus?
File format and size - What do you need from the photographer? RAW is always preferable, just make sure you have the software that will open up whatever type of file you request.
Good luck! We hope this provides you with the tools for success for your next remote shoot!
- This guide created by FINE Designer, Amanda Joy-Frank